Mastering Automation Testing with Robot Framework: A Comprehensive Guide

I am a QA Engineer.
Welcome to this blog post about Robot Framework, a powerful tool for automation testing. In this post, we will introduce the topic and explain what is Robot Framework and why it is useful for automation testing. Additionally, we will go through a step-by-step to from setting everything up to developing our first test case and running it with Robot Framework.
What is Robot Framework?
Robot Framework is an open-source framework that provides a simple and consistent way to write test cases using a keyword-driven approach. Robot Framework supports various libraries and tools that can be used to automate different types of testing, such as web, mobile, desktop, API, database, and more. Robot Framework also has a rich ecosystem of plugins and extensions that can enhance its functionality and integration with other tools.
Why it is useful for Automation Testing?
One of the main benefits of Robot Framework is that it allows testers to write test cases in a natural and readable language, without requiring programming skills. This makes the test cases easy to understand, maintain, and reuse. Robot Framework also has a built-in reporting and logging mechanism that can generate clear and detailed reports of the test execution and results. Robot Framework can also be easily integrated with continuous integration and delivery pipelines, enabling faster feedback and quality assurance.
More importantly, it comes with a batch of useful built-in libraries like:
robotframework-seleniumlibrary
robotframework-appiumlibrary
robotframework-requests
etc,.
QA Engineers can now streamline their testing process by automating various types of tests, including web, mobile, and API tests, with ease. This not only saves time but also eliminates the need to write raw Selenium, Appium, or API code in different programming languages, which can be time-consuming and prone to complexities leading to errors in the testing code. By adopting this approach, testers can ensure more efficient and bug-free testing procedures.
With no limitations, if these libraries are insufficient enough for the test automation project, we have the flexibility to develop our custom library add-ons within our test project using Python programming language. Leveraging the power of Python enables us to overcome any obstacles and ensures that our automation project can meet any unique requirements. The possibilities are boundless, and we can tailor our solutions to address specific challenges effectively.
Get Started
Hence, Robot Framework was developed using Python as its core foundation. To begin your journey with Robot Framework, you'll need to ensure Python is installed on your system. Python comes with a handy package manager called pip, which plays a vital role in installing any required Robot Framework libraries for your automation project. Let's dive in and set up everything you need to embark on seamless test automation using Robot Framework.
Setting Up a Virtual Environment for Robot Framework
To ensure a clean and isolated environment for our Robot Framework project, we will set up a virtual environment and install all the required libraries within it. Follow the steps below to get started:
Step 1: Install Python Virtual Environment
To begin, we need to install the Python virtual environment package. Open your command prompt or terminal and run the following command:
pip install virtualenv
Step 2: Create the Project Folder
Create a dedicated folder for your Robot Framework project. Let's name it "RobotFramework-Demo".
Step 3: Set Up the Virtual Environment
Within the "RobotFramework-Demo" folder, set up the virtual environment by running the following command:
python3 -m venv venv
Step 4: Activate the Virtual Environment
# Linux and Mac OS
source vevn/bin/activate

# on window OS command prompt
venv/Scripts/activate.bat

# on window OS PowerShell
venv/Scripts/Activate.ps1
Installing Required Libraries for Your Robot Framework Project
With the virtual environment activated, you can now install any necessary libraries specific to your automation project. This will ensure that the dependencies are isolated from other projects.
Install Robot Framework Library
First and foremost, we need to install the Robot Framework library. Execute the following command:
pip install robotframework
Install Selenium Robot Framework Library
For demonstration purposes, let's begin our automation test project with a web application that has a simple login feature. We will use the URL https://www.demo.guru99.com/ as our testing target.
To effectively automate testing for web applications, you'll require the Selenium library. Install it with the following command:
pip install robotframework-seleniumlibrary
Setting Up WebDriver
For running a Web Automation, we must have WebDriver set up. Please refer to my below blog post for setting up WebDriver instructions.
Blog Post: Setting Up WebDriver for Automation Testing
Understanding the Robot Framework Structure
Before delving into writing a login test script, it is essential to familiarize yourself with the structure of the Robot Framework. The Robot Framework uses a simple and intuitive syntax that makes it user-friendly for both beginners and experienced testers. The main components of a Robot Framework file are as follows:
File Extension: Robot Framework files typically have a "
.robot" extension. It is vital to ensure that your script file ends with this extension for it to be recognized by the framework.Settings Section: The
*** Settings ***section is where you define various configurations for your test suite. This section allows you to import libraries, and specify test-level settings. It plays a crucial role in customizing the behavior of your tests.Variables Section: In the
*** Variables ***section, you can define variables that will be used throughout your test suite. Variables make your scripts more flexible and allow you to change values easily without modifying the test steps.Tests Section: The
*** Test Cases ***section is where you write your actual test cases. Each test case consists of a series of steps that the automation script will execute. These steps are written in a human-readable keyword-driven format, making it easy to understand and maintain the test cases.Keywords Section: The
*** Keywords ***section contains reusable keyword definitions. Keywords are small, reusable building blocks that represent a specific action or a set of actions. They help in keeping the test cases concise, maintainable, and easily modifiable.
Let's Develop a Login Test Script
Step1: Creating the Test File
To start, let's create a new file named "Login.robot" inside the RobotFramework-Demo project. This file will contain our login test script. Here's the content of the Login.robot file:
*** Settings ***
Library    SeleniumLibrary
Test Setup    Begin Web Test
Test Teardown    End Web Test

*** Variables ***
${Guru99_URL}    https://demo.guru99.com/V4/index.php
${UserID_filed_xpath}    //input[@name="uid"]
${Password_filed_xpath}    //input[@name="password"]
${Login_button_xpath}    //input[@name="btnLogin"]

*** Test Cases ***
Test Login Guru99 Website
    [Documentation]    Ensure the login functionality working properly
    Go to Guru99 Login Page
    Enter UserID    mngr518647
    Enter Password    UvAnytU
    Click Login Button
    Login Should be Success

*** Keywords ***
Begin Web Test
    Open Browser    about:blank    chrome

End Web Test
    Close Browser

Go to Guru99 Login Page
    Go to    ${Guru99_URL}

Enter UserID
    [Arguments]    ${loginUserID}
    Input Text    ${UserID_filed_xpath}    ${loginUserID}

Enter Password
    [Arguments]    ${loginPassword}
    Input Text    ${Password_filed_xpath}    ${loginPassword}

Click Login Button
    Click Element    ${Login_button_xpath}

Login Should be Success
    Wait Until Page Contains    Welcome To Manager's Page of Guru99 Bank
Understanding the Script
In the
Settingssection, we import theSeleniumLibraryto interact with the web browser for our tests. TheTest SetupandTest Teardownkeywords ensure that the browser is opened before each test case and closed after each test case, respectively.The
Variablessection contains the necessary variables for our test, such as the Guru99 website URL and the XPath locators for the username field, password field, and login button.For example,
${UserID_filed_xpath}holds the XPath locator for the username input field, and${Password_filed_xpath}holds the XPath locator for the password input field.XPath, short for XML Path Language, is a query language used to navigate through XML or HTML documents and identify specific elements. In our test script, we use XPath to interact with web elements and perform actions like entering text and clicking buttons.
If you are new to XPath, don't worry! It might seem intimidating at first, but once you understand the basics, it becomes a powerful tool for locating elements on a web page. For a comprehensive introduction to XPath usage, I recommend checking out my other blog post titled "Xpath that every Automation Tester Must know: Basic Xpath for Beginner".
The
Test Casessection defines our main test case, titled "Test Login Guru99 Website," with a description provided in the[Documentation]section.Within the test case, we have several steps, including navigating to the Guru99 login page, entering a specific user ID and password, clicking the login button, and verifying the successful login by checking for the presence of the welcome message on the home's page.
The
Keywordssection contains custom keywords that perform specific actions, such as opening and closing the browser, navigating to a URL, entering text into fields, clicking elements, and verifying page content.
Step2: Test Execution
To execute the test script, Run the following command in your terminal:
robot -d Reports Login.robot
To run any robot test script we must start with
robot.The
-d Reports(optional) is to generate a report inside that separated Reports folder.The test script will open a Chrome browser, navigate to the Guru99 login page, enter the provided user ID and password, click the login button, and verify that the login is successful by checking for the presence of the welcome message on the manager's page.
%[https://youtu.be/3q-tsH8eG_U]
Step3: Analyze the Test Report
After the test execution is complete, navigate to the "Reports" folder in your project directory. Inside the "Reports" folder, you will find an HTML file named "report.html." This file contains the detailed test report.
Open the "report.html" file using a web browser. The report provides a summary of test execution, including the total number of test cases, the number of passed and failed test cases, and the overall pass percentage.
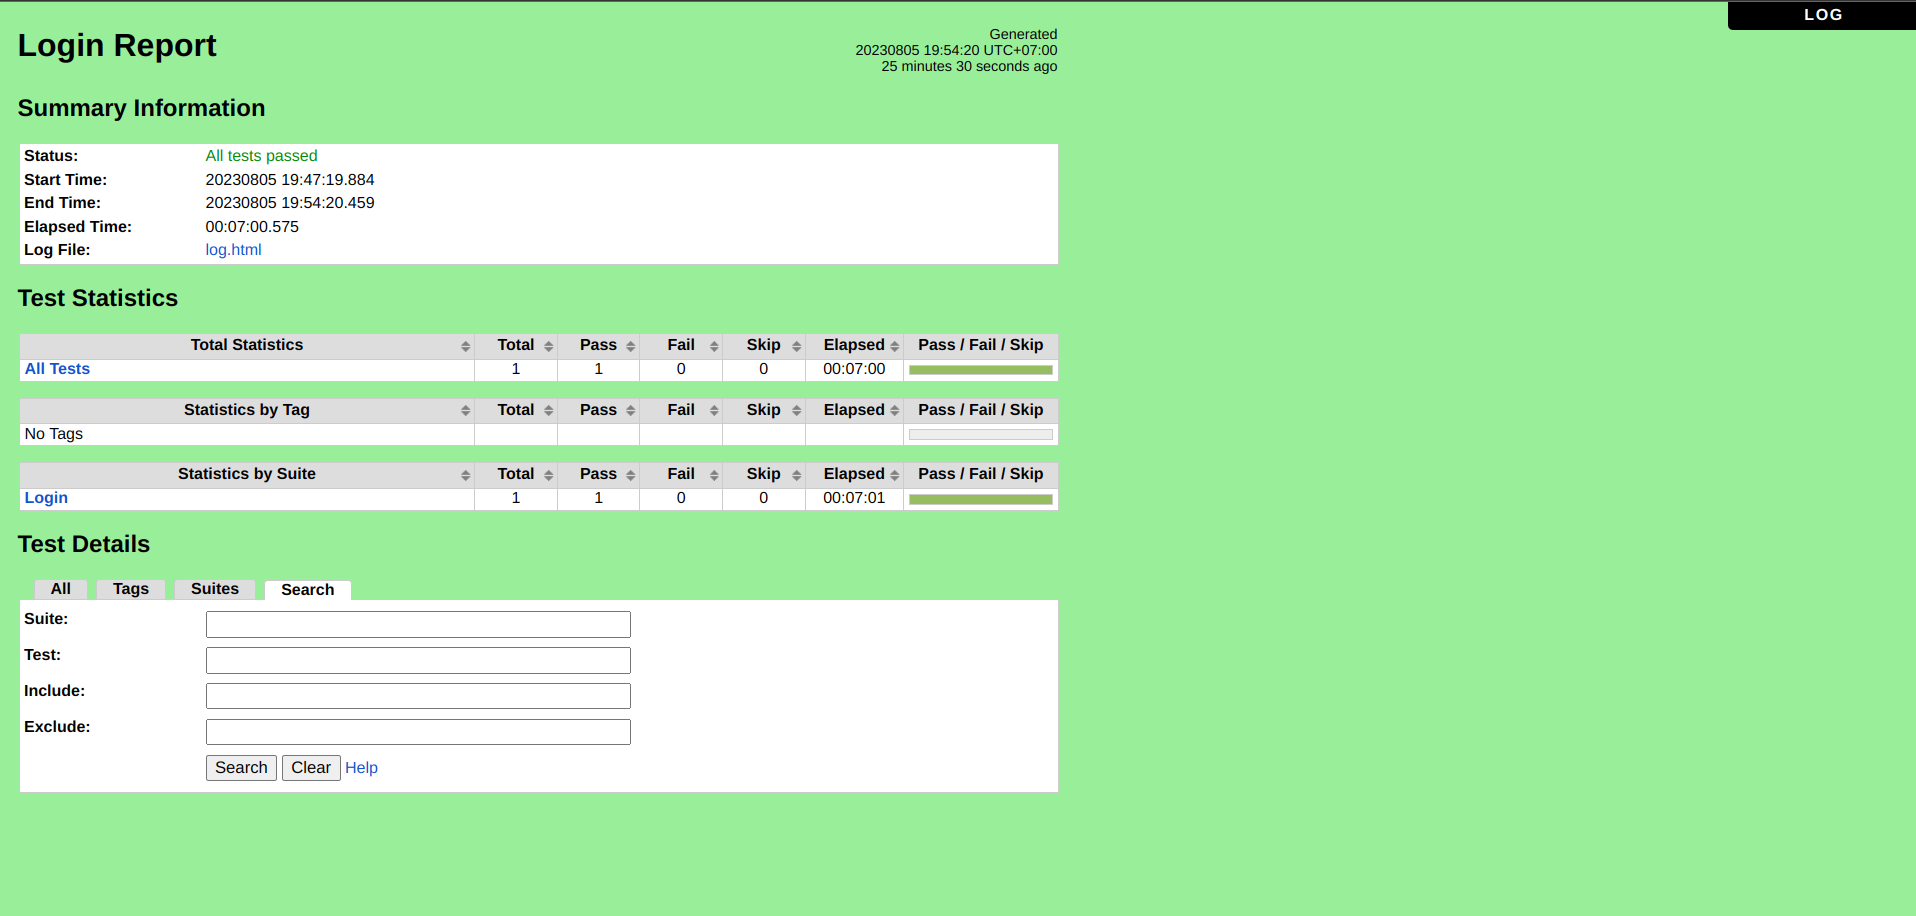
You can click on each test case name in the report to view its detailed execution log. The log displays the step-by-step actions performed during the test case execution, along with the status of each step (pass/fail) and any additional log messages.
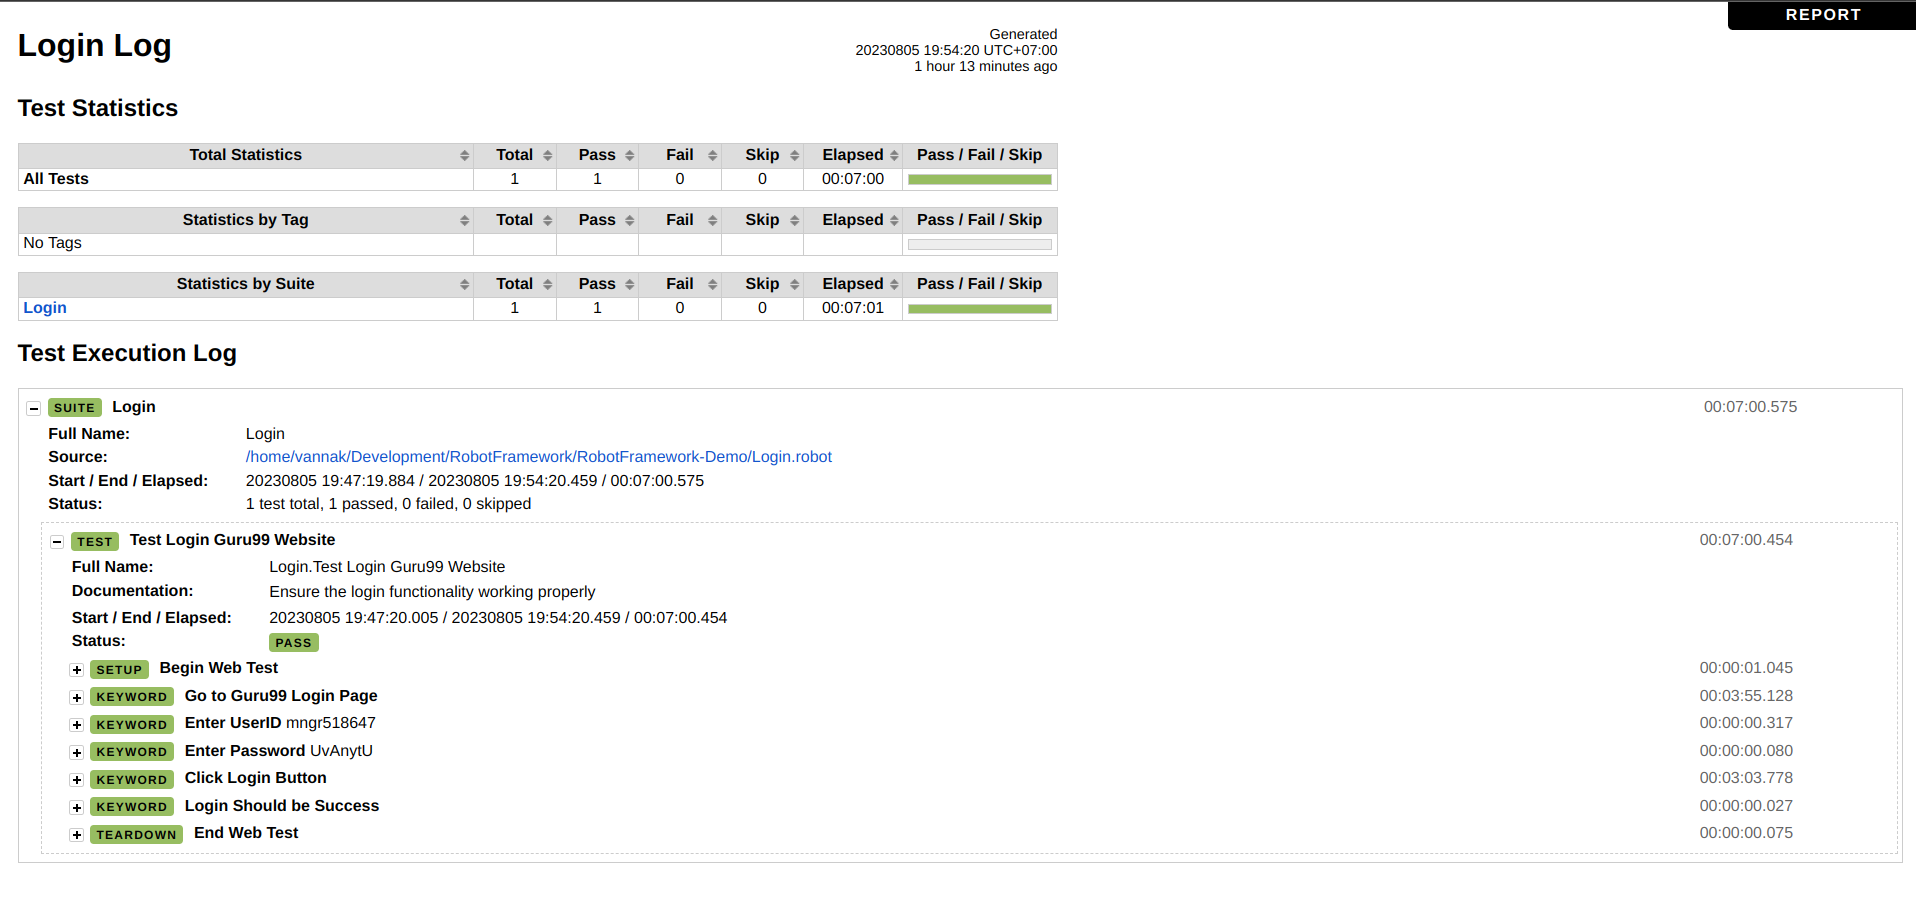
Review the Log File
Additionally, Robot Framework generates a log file named "log.html" inside the "Reports" folder. The log file provides more detailed information about the test execution, including individual keyword calls, arguments passed to keywords, and overall execution status.
Open the "log.html" file in your web browser to view the complete log of the test execution.
Analyze Test Failures
In case any test cases fail during execution, the detailed logs and reports will help you identify the cause of the failure. Look for the "FAIL" status in the logs to pinpoint the step where the test case failed. Additionally, the log messages and any error messages in the report can provide further insights into the issue.
By analyzing the logs and reports, you can quickly address any failures and troubleshoot potential issues in your automation test script.
Conclusion
Robot Framework is a powerful and user-friendly tool for automation testing. With its keyword-driven approach and easy-to-read syntax, testers can quickly write and maintain test cases without the need for extensive programming knowledge. The framework's integration with various libraries and tools makes it suitable for automating different types of testing, such as web, mobile, and API testing.
By following the steps in this blog post, you have set up a virtual environment for your Robot Framework project and developed your first test case for a web application using Selenium Library. You have also learned how to generate detailed reports and logs to analyze the test results effectively.
With Robot Framework's flexibility and extensive capabilities, you can create robust and efficient automation test suites to ensure the quality and reliability of your software products.
In the next section, we will explore the advanced capabilities of Robot Framework. We'll be delving into various topics, including test data-driven testing, effectively handling dynamic web page elements, creating a custom library using Python, configuring Selenium Grid for test execution, conducting mobile testing using the Appium library, organizing the project structure using the page object model, and much more. Stay tuned for more exciting insights into the world of test automation with Robot Framework!


